

This is the fifth of six articles included in the series entitled Fly Fishing for Shad- The Basics.
My first attempt at catching shad on the fly back in February of 2011 was a complete and total failure. I went out on the river with little knowledge or experience to draw on and came up empty handed. I took an 8 weight fly rod with a floating line, attached a fly weighted with bead chain eyes, cast as far as I could in no particular direction, and immediately started stripping the fly line in fast foot-long strips. No wonder I did not catch anything!
After a failed trip or two, I started reading everything that I could get my hands on and found out that fly fishing for shad and jazz music have a lot in common. You see, “it don’t mean a thing, if it ain’t got that swing.” If you want to consistently catch shad on a fly, you need to become a master of swinging the fly.
Swinging the fly is really a very traditional way of fly fishing. It essentially means you are fishing a fly across stream, and then down stream on a tight line. Trout fisherman are familiar with this technique and typically fish small nymphs or wetflies in this way. Here is a basic illustration to help you visualize:
The basic technique goes something like this:
- Stand facing the river with your back roughly parallel to the shore.
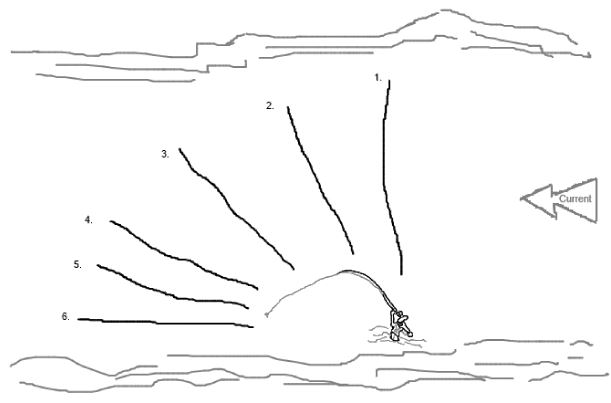
- Make a cast perpendicular (90 degrees) from shore. In other words, just a straight forward cast. Position #1 on the illustration.
- Allow the fly to sink while the current pulls the line downstream of you. Position #2 and #3 on the illustration. Somewhere between #3 and #4 is where the fly will be at its deepest.
- When the fly line is straight downstream of you, begin stripping the fly back towards you. Somewhere between #5 and #6 is where you will begin stripping the fly
- Repeat
Shad will typically bite right as the end of the line is close to the end of its travel straight downstream (somewhere between position #5 and #6 above,) or as you start stripping the fly back to you. If you think about it, as the fly line starts to straighten downstream it will begin to lift the fly from the bottom (somewhere between position #4 and #6) from its dead drift, back up in the water column, and that is most likely what elicits the strike. If it doesn’t, retrieving the fly usually does. My preferred technique is the Figure of Eight retrieve.
This basic technique for catching shad is useful when fishing relatively slow, somewhat shallow water with a properly weighted fly. If you do not catch a shad after swinging the fly a few times, and are wading, take a couple of steps either upstream or downstream and repeat the process. Likewise, if fishing from a boat, reposition the boat in a similar manner.
So far none of this is too complicated. In a perfect world, with perfect water conditions, and no wind, this is a great technique. Too often though, you might feel like you are not getting the fly down deep enough and need to modify the basic technique. Some might ask “how do I know if I am getting deep enough?” The answer is, you are either catching fish, or snagging the odd muscle, grass or bottom from time to time. Note: If you are catching bottom on every cast you are either using too heavy of a fly, sink tip/ polyleader, or both.
A simple modification to the basic technique is to simply quarter upstream. This is done by making a cast somewhere between 45-50 degrees (position #1 on the illustration below) upstream of you rather than making a cast at 90 degrees (position #2 on the illustration below.) Here is an illustration:
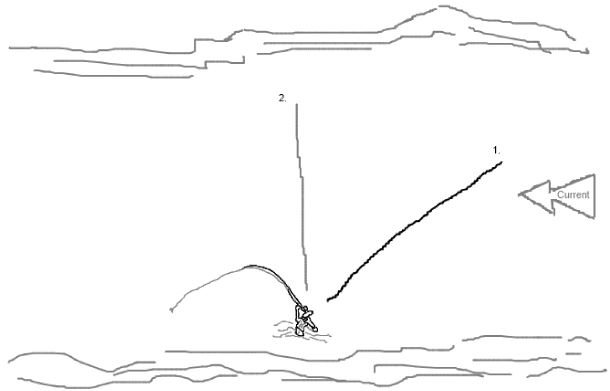
Quartering upstream gives the fly even more time to sink versus just casting across river. By quartering upstream, by the time the fly line gets to position number #2 or #3 in Illustration #1, it has probably reached its greatest depth, providing more time in the strike zone.
One issue you may come across when trying to quarter upstream are uneven water currents or uneven surface currents (caused by wind) pulling different areas of the fly line at different rates. This can create slack in the line which can cause you to miss strikes. Remember, swinging the fly is a tight line tactic, and if there is slack in the line, when a fish strikes and you set the hook, either by lifting the rod or with a strip-set (my preferred method,) you must take in the slack before the energy makes it to the hook and firmly places the hook point in Mr. Shad’s mouth. The solution is to prevent slack in the line by mending.
Mending confuses a lot of people. At its basic core, it is simply lifting the rod tip and placing the line near the rod back upstream of where it just was. Trout fishermen use the technique to get a drag free drift of a dry fly, something that is important in trout fishing. Shad do not care about drag, they are not as weary as a trout in a clear stream. In fact, drag can actually be a good thing (when you can control it at will using mending,) as it can be used to lift the fly at different places in the swing’s drift. For a shad fisherman, mending is simply used to keep good tight contact between you and the fly at the end of the line. Take a look at Illustration #3 below:
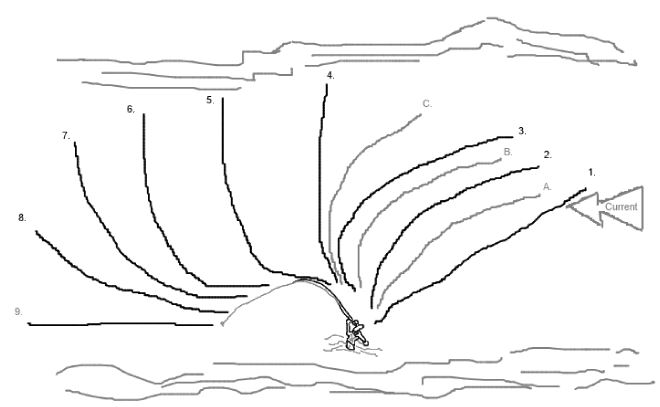
- You have made a cast and quartered upstream. Drop your rod tip to about 1ft above the water surface. Follow the line with your rod tip to position #2
- When the line gets to position #2 , lift your rod tip about waist high and place the line on position A, and then lower your rod back to 1ft above the water. Continue to follow the line with your rod tip to position #3. Note: you obviously cannot pickup the entire line and move it, it will just be a section of the line closest to you. This creates a little reverse “J” or slight bow in the line, but things are tight, so do not worry.
- When the line gets to position #3 , lift your rod tip about waist high and place the line on position B, and then lower your rod back to 1ft above the water. Continue to follow the line with your rod tip to position #4.
- Position #4 should be about straight across the river (90 degrees.) At this point, I will make one final mend to position C and then I will generally stop mending and allow the line to drift downstream. However, conditions vary, and you can continue to mend downstream if necessary, or to change the presentation. Continue to follow the line with your rod tip. Note: the reverse “J” will become more pronounced if you continue to mend past 90 degrees. This can be used to your advantage and I will explain more below.
- From position #5 through #7, the fly is basically as deep as it will get and will be dead drifting
- From position #7 through #9, the line begins to straighten at an accelerated rate which in turn lifts the fly at an accelerated rate. This is usually where you get a strike, if not, retrieve the fly and repeat the process
Depending on the angle of the “J” or bow in the line, as the line approaches the end of its travel to straight downstream, the fly will start its journey upwards through the water column at different times and speeds. This is where the magic starts. Once you have mastered the basic upstream quarter with mending, you can start to take control of just when and where that fly starts to rise, and this is what I have found elicits the most strikes.
Play around with the mending to create different presentations of the fly to the shad. Add more or change your timing to match the water conditions. Doing so means you have more options to try, and will hopefully be catching shad before having to move spots. You can try a basic swing, then a quarter upstream, then a quarter with mends, then several variants of the quarter and mend method to change just exactly when and where the fly begins to rise. If none of those techniques are catching shad, move up or downstream and try again until you find the fish.
Pingback:Fly Lines for Shad - Shad on the Fly
Pingback:Fly Lines for Shad - Shad on the Fly